Pages

Revert Ubuntu boot loader after installing Window 7

This post will describe to install Ubuntu GRUB boot loader after installing windows 7 on a PC that already Ubuntu installed. Also this is a problem that I faced after installing Windows 7. Suddenly my Windows 7 installation was crashed and I formatted Windows installed drive and reinstall the Windows 7. I was used Windows and Ubuntu installed on different drives as a dual boot. But after installing windows 7 Ubuntu boot loader was overwritten by windows boot loader and that boot loader does not list my Ubuntu installation. Therefore I could not select Ubuntu to load and windows boot loader automatically boot the Windows7 itself. To overcome this problem we have to overwrite GRUB boot loader on windows boot loader. Follow the steps that I explained bellow correctly to do that.

This method will copy boot settings from Ubuntu Live-CD in order to boot from GRUB boot loader.

Step1- Insert Ubuntu Live CD into CD drive and boot from it.


Step2- Click on 'Try Ubuntu' (on Ubuntu 11.04) to load Ubuntu from Live CD without affecting to your computer.


Step3- When Ubuntu Live desktop appear Run 'Terminal' (Application-->Accessories-->Terminal) to execute following commands.
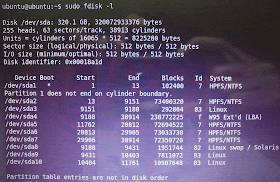
Step4- In terminal type sudo fdisk -l
It will display all partitions on the hard disk with some details
Identify the partition which Ubuntu installed by checking 'System' column from the above result. The partition which has 'Linux' under system column is the partition of Ubuntu installed.

But here(in my computer) 3 partitions hold 'Linux' under system column. Therefore you should identify the correct partition. For that you can use 'Disk utility' software(it is already included in Live-CD session). Still complicated to identify the partition please be patient, it can be identify in next step.


Step5- Mount the Ubuntu partition drive
    sudo mount /dev/sdXX /mnt
    (Example- sudo mount /dev/sda9 /mnt)

Now go to Home directory(Place-->Home), go to root directory and go to mnt directory by double clicking. Make sure here the folders such as 'boot', 'opt', 'usr' and 'bin' etc exists on this directory(/mnt directory). If not you could not mount Ubuntu installed partition to the mnt, so unmount it and mount the correct partition to the mnt.(To unmount type sudo unmount /mnt)

Step6- If you have different partitions for boot, home, etc... mount them to each corresponding directory in /mnt directory.
Example- sudo mount /dev/sda3 /mnt/boot
                sudo mount /dev/sda10 /mnt/home
(to check whether you mount correct partition to the correct directory check out the content of each directories)

Step7- Now all the files that are required had mounted and ready to install GRUB boot loader.

sudo grub-install --root-directory=/mnt /dev/sda

(Note-That's /dev/sda the hard disk itself, not Ubuntu installed partition)
If it says grub-install is not a command then you had some mistake on mounting.

Step8- Unmount and restart
    unmount all the partitions that mounted.
    Restart the computer - sudo reboot


That's it. Now you can see the GRUB boot loader with all the installed operating system listed.

Use Android phone as a modem (Internet connection to PC through Android phone)

First of all I would like to say happy new year to all of you. So this is my first post in 2012.

This post is based on a problem that I faced after -->brought an Android phone. Oh I forgot to say you, I brought an Android phone it is Sony Ericsson Experia X10 mini pro. The problem that I faced is 'How to connect this phone and establish a internet connection in PC'. You know most of the normal phone that capable GPRS can connect to PC(USB or bluetooth) and establish the internet connection over phone. Earlier I used a Nokia phone(Nokia 3120 classic). It can be used as a modem to pc, therefore I could brows internet in PC through the phone.
But in this Android phone it is a little bit different. Because this is an Android phone *#%@.=+.

Simply here are steps to configure your Android phone as a modem.

First of all you have to download and install software needed in both sides, phone and PC. This task is just like a client-server application. So first, lets install on the phone.

The software is EasyTether. EasyTether allows you to shares your phone Internet connection with computer/laptop/notebook (Windows 7/Vista/XP 64-bit/32-bit, Mac OS X 10.4/10.5/10.6/10.7, Ubuntu 10.4+, Fedora 13+)

you can download Easy Tether from Android market and install it from your phone it self. But there is a thing to say you this is not a Free software. But Lite version of Easy Tether is available in Android market but the latest version of the EasyTether Lite has some restrictions since it is lite version. Such as blocking secure HTTP sites....... Therefore this is not a complete solution. But there is a way to Activate the EasyTether. Follow these steps to achieve the EasyTether.

The older version of the EasyTether has the Activation code for full version. Therefore you have to install an older version of Easy tether to get the code.

  • First download EasyTether 0.9.3 apk file from here or here.
  • Install the apk file manually to the phone.
  • Open the EasyTether from the phone ans just go to 'About' page and write down 5 digit code (under 'Registration code'). So this is the activation code for your phone.
  • Now uninstall EasyTether 0.9.3 from your phone to install latest version.
  • Install latest version of the EasyTether Lite version(free version)from the Android market.
  • Open it. In first start, EasyTether will show a dialog box about a setup wizard or some thing like that. Just cancel it(You can get it later from setup) and tap on 'Activate EasyTether' to activate the product.
  • Here you should type the 5 digit number which you written under 'Activation code'
  • Now you have the full version of the EasyTather with all capabilities.

Now tap on 'Setup/Settings' and tap on 'USB Tethering setup' to configure your computer for EasyTether. now a setup wizard for the configuration will open and you can easily follow the instruction. This setup wizard is more descriptive and easy. Therefore I think that is no need to explain these steps here. Additionally you have to download the EasyTether software for PC.(The setup wizard will inform you to download and install it to your PC).

Additionally make sure the network drivers installed on your PC. In Windows you can be found it in 'Device manager' under 'Network adapters' named 'Easy Tether Network Adapter'.

Finally you will be able to connect to internet through your Android phone.

To establish the connection just plug USB cable and click on 'Connect' by right click on the EasyTether icon from sys tray in Windows.